Windows 10や11で、ファイルを圧縮・解凍(展開)する場合、サードパーティーの圧縮・解凍ツールを利用している方も多いと思いますが、標準機能でもファイルを圧縮したり解凍することができます。
そこでここでは、Windows 10や11の標準機能でファイルを圧縮したり解凍する方法を紹介します。
目次
ファイルの圧縮
マウス操作で圧縮
マウス操作でファイルを圧縮するときは、Windows 10では、圧縮したいファイルを右クリックして、メニューの「送る」から「圧縮(zip形式)フォルダー」をクリックすることで、ファイルをZIP形式で圧縮できます。
また、ZIPファイルに限り、すでにあるZIPファイルにファイルやフォルダーをドラッグ&ドロップして、ZIPファイルにファイルに追加することもできます。
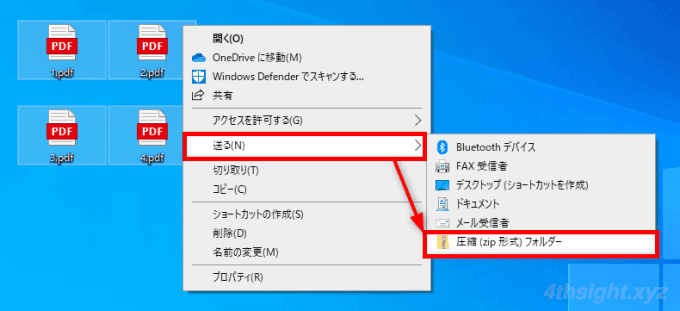
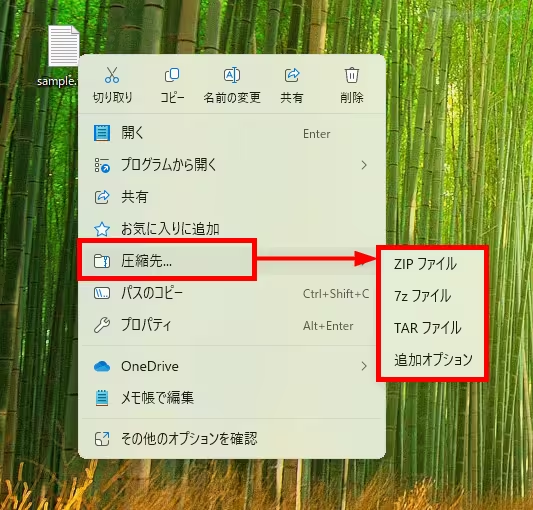
Windows 11では、圧縮したいファイルを右クリックして、メニューの「圧縮先」から圧縮形式を選択します。(Windows 11では、ZIP形式以外に、7zやTARを選択でき、圧縮方式や圧縮レベルの調節もできます。)
なお、Windowsの標準機能では、パスワード付きのZIPファイルは作成できません。
Windowsコマンドで圧縮
Windows 10や11にはtarコマンドが標準搭載されており、このコマンドを使ってgzip形式でファイルを圧縮することができます。
たとえば「E:¥sample1.txt」「E:¥sample2.txt」という2つのファイルを圧縮したいときは、以下のようにコマンドを実行することで「E:¥archive.tgz」という圧縮ファイルを作成できます。
C:\> tar -czvf E:¥archive.tgz E:\sample1.txt E:\sample2.txtPowerShellコマンドレットで圧縮
PowerShellの「Compress-Archive」コマンドレットを使えば、ファイルをZIP圧縮することができます。(なお「Compress-Archive」コマンドレットは、パスワード付きZIPファイルは作成できません。)
Compress-Archive | Microsoft Docs
基本的な書式は、次のとおりです。
PS> Compress-Archive -Path <圧縮したいファイル> -DestinationPath <出力ファイル名>「-Path」オプションで圧縮するファイルやフォルダーを指定し「-DestinationPath」オプションで出力するファイル名を指定します。
単一ファイルを圧縮する
単一のファイルを圧縮する場合は、次のように実行します。
PS> Compress-Archive -Path E:\sample.txt -DestinationPath E:\test.zip複数ファイルを圧縮する
複数のファイルを圧縮する場合は、カンマ区切りで複数ファイルを指定するか、ワイルドカードで指定することができます。
PS> Compress-Archive -Path E:\sample.txt, E:\samaple2.txt -DestinationPath E:\test2.zipPS> Compress-Archive -Path E:\*.txt -DestinationPath E:\test3.zipワイルドカードを使用したくないとき
意図しないファイルが対象とならないよう、意識的にワイルドカードを使用しない場合は、「-Path」オプションの代わりに「-LiteralPath」オプションを利用します。
PS> Compress-Archive -LiteralPath E:\sample.txt, E:\samaple2.txt -DestinationPath E:\test2.zip圧縮するファイルをパイプで渡す
圧縮するファイルは、パイプで渡すこともできます。
PS> Get-ChildItem E:\*.txt | Compress-Archive -DestinationPath E:\test4.zip既存のZIPファイルにファイルを追加する
「-Update」オプションを利用すると、既存のZIPファイルにファイルを追加できます。
PS> Compress-Archive -Path E:\sample3.txt -DestinationPath E:\test3.zip -Update圧縮レベルを指定する
「-CompressionLevel」オプションを利用すると、圧縮率や圧縮スピードを指定できます。
指定可能な値は、次のとおりです。
- Optimal - 最適な圧縮率を使用します。(デフォルト)
- Fastest - 処理時間が最速となる圧縮率を使用します。
- NoCompression - 圧縮は行わず、書庫化だけを行います。
PS> Compress-Archive -Path E:\*.txt -DestinationPath E:\test3.zip -CompressionLevel Fastest圧縮ファイルの解凍(展開)
マウス操作で解凍
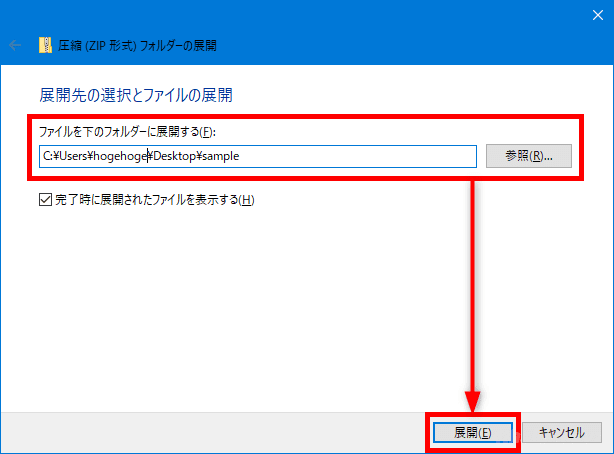
マウス操作で圧縮ファイルを展開するときは、圧縮ファイルを右クリックして、メニューから「すべて展開」をクリックします。

すると「展開先の選択とファイルの展開」画面が表示されるので、展開先のフォルダーを指定して「展開」をクリックします。
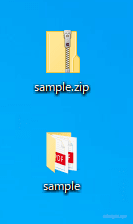
なお、デフォルトの展開先は、圧縮ファイルと同じ場所に圧縮ファイルと同じ名前のフォルダーが生成され、そこに展開されます。
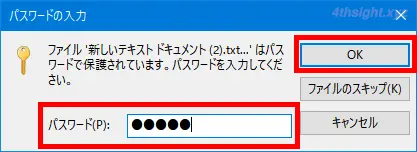
パスワード付きZIPファイルを展開するときは、以下のようにパスワードの入力画面が表示されるので、解凍パスワードを入力して「OK」をクリックします。
以上で、指定したフォルダーにZIPファイルが展開されます。
なお、Windows 10はZIPファイルにしか対応していませんが、Windows 11ならZIPファイルだけでなく、tarやgz、rar、7zといった圧縮ファイルも上と同じ手順で解凍できます。
Windowsコマンドで解凍
Windows 10や11には、tarコマンドが標準搭載されており、このコマンドでZIPファイルやパスワード付きZIPファイル、tarファイル、tgzファイルを解凍できます。
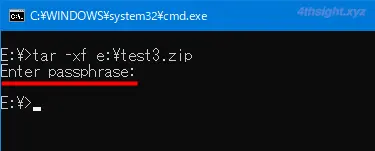
たとえば「E:¥test3.zip」ファイルを解凍したいときは、以下のようにコマンドを実行することで、カレントディレクトリ「C:¥」にファイルが展開されます。
C:\> tar -xvzf E:\test3.zipなお、パスワード付きZIPファイルを展開すると「Enter passphrase:」と表示されるので、解凍パスワードを入力することで展開できます。
PowerShellコマンドレットで解凍
PowerShellの「Expand-Archive」コマンドレットを使えば、ZIPファイルを解凍することができます。(なお「Expand-Archive」コマンドレットは、パスワード付きZIPファイルは展開できません。)
Expand-Archive | Microsoft Docs
基本的な書式は、次のとおりです。
PS> Expand-Archive -Path <ZIPファイル> -DestinationPath <展開先フォルダー>「-Path」オプションでZIPファイルを指定し「-DestinationPath」オプションで展開先のフォルダーを指定します。
PS> Expand-Archive -Path E:\test.zip -DestinationPath E:\test「-DestinationPath」オプションを指定せずに実行すると、カレントディレクトリにZIPファイル名と同名のフォルダーが作成され、その中に解凍されます。
以下の例では、Cドライブ直下に「test」という名前のフォルダーが作成され、その中に解凍されます。
PS> Expand-Archive -Path E:\Test.zip展開先のフォルダーに同名のファイルがある場合、そのまま展開するとエラーとなるため、上書きする場合は「-Force」オプションを使用します。
PS> Expand-Archive -Path E:\Test.zip -DestinationPath E:\test -Force