Windows環境からOpenVPNサーバーに接続する場合、専用のクライアントソフトウェアが必要になり、公式サイトからは「OpenVPN Connect」というツールが提供されています。
そこでここでは「OpenVPN Connect」を使って、OpenVPNサーバーに接続する方法を紹介します。
目次
事前準備
接続先情報などが記載されたovpnファイルをダウンロードできる場合は、ファイルをダウンロードしたら、下記の「OpenVPN Connectの使い方」へ進んでください。
まず、OpenVPNサーバー上で作成した以下のファイル一式を、Windowsマシンの管理しやすいフォルダーにダウンロードします。
- 認証局の秘密鍵「ca.crt」
- クライアンの証明書「user1.crt」
- クライアントの秘密鍵「user1.key」
- TLS-Auth⽤共有鍵「ta.key」
- サンプルプロファイル「/usr/share/doc/openvpn-2.4.11/sample/sample-config-files/client.conf」
つぎに、ダウンロードしたサンプルプロファイルをメモ帳などのテキストエディタで開いて、接続先や証明書、秘密鍵などの情報を入力してから、ファイル名の拡張子を「.ovpn」として同じフォルダー内に保存します。
以下に、修正箇所を赤字で表示しています。一般的なOpenVPNサーバーであれば、赤字の部分のみの修正でOKです。
##############################################
# Sample client-side OpenVPN 2.0 config file #
# for connecting to multi-client server.     #
#                                            #
# This configuration can be used by multiple #
# clients, however each client should have   #
# its own cert and key files.                #
#                                            #
# On Windows, you might want to rename this  #
# file so it has a .ovpn extension           #
##############################################

# Specify that we are a client and that we
# will be pulling certain config file directives
# from the server.
client

# Use the same setting as you are using on
# the server.
# On most systems, the VPN will not function
# unless you partially or fully disable
# the firewall for the TUN/TAP interface.
;dev tap
dev tun

# Windows needs the TAP-Win32 adapter name
# from the Network Connections panel
# if you have more than one.  On XP SP2,
# you may need to disable the firewall
# for the TAP adapter.
;dev-node MyTap

# Are we connecting to a TCP or
# UDP server?  Use the same setting as
# on the server.
;proto tcp
proto udp

# The hostname/IP and port of the server.
# You can have multiple remote entries
# to load balance between the servers.
remote <OpenVPNサーバーのホスト名/IPアドレス> 1194
;remote my-server-2 1194

# Choose a random host from the remote
# list for load-balancing.  Otherwise
# try hosts in the order specified.
;remote-random

# Keep trying indefinitely to resolve the
# host name of the OpenVPN server.  Very useful
# on machines which are not permanently connected
# to the internet such as laptops.
resolv-retry infinite

# Most clients don't need to bind to
# a specific local port number.
nobind

# Downgrade privileges after initialization (non-Windows only)
;user nobody
;group nobody

# Try to preserve some state across restarts.
persist-key
persist-tun

# If you are connecting through an
# HTTP proxy to reach the actual OpenVPN
# server, put the proxy server/IP and
# port number here.  See the man page
# if your proxy server requires
# authentication.
;http-proxy-retry # retry on connection failures
;http-proxy [proxy server] [proxy port #]

# Wireless networks often produce a lot
# of duplicate packets.  Set this flag
# to silence duplicate packet warnings.
;mute-replay-warnings

# SSL/TLS parms.
# See the server config file for more
# description.  It's best to use
# a separate .crt/.key file pair
# for each client.  A single ca
# file can be used for all clients.
ca ca.crt ←ダウンロードしたCA証明書のファイル名
cert user1.crt ←ダウンロードしたクライアント証明書のファイル名
key user1.key ←ダウンロードしたクライアント秘密鍵のファイル名

# Verify server certificate by checking that the
# certicate has the correct key usage set.
# This is an important precaution to protect against
# a potential attack discussed here:
#  http://openvpn.net/howto.html#mitm
#
# To use this feature, you will need to generate
# your server certificates with the keyUsage set to
#   digitalSignature, keyEncipherment
# and the extendedKeyUsage to
#   serverAuth
# EasyRSA can do this for you.
remote-cert-tls server

# If a tls-auth key is used on the server
# then every client must also have the key.
tls-auth ta.key 1 ←ダウンロードしたTLS-Auth⽤共有鍵のファイル名

# Select a cryptographic cipher.
# If the cipher option is used on the server
# then you must also specify it here.
# Note that v2.4 client/server will automatically
# negotiate AES-256-GCM in TLS mode.
# See also the ncp-cipher option in the manpage
cipher AES-256-CBC

# Enable compression on the VPN link.
# Don't enable this unless it is also
# enabled in the server config file.
#comp-lzo

# Set log file verbosity.
verb 3

# Silence repeating messages
;mute 20
「OpenVPN Connect」の使い方
つぎに、公式サイトから「OpenVPN Connect for Windows」をダウンロードします。
OpenVPN Connect Client | Our Official VPN Client | OpenVPN
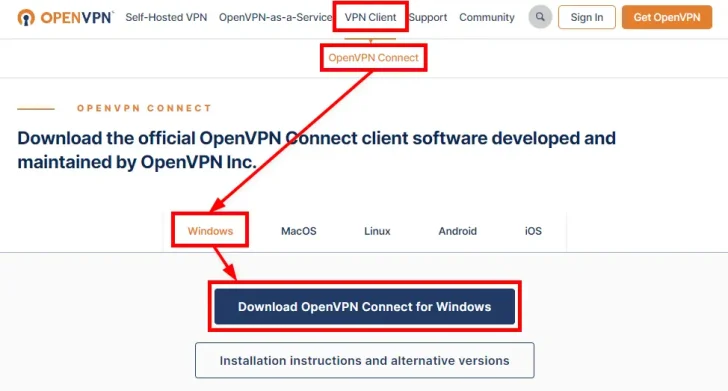
つぎに、ダウンロードしたインストーラーを実行して、OpenVPN Connectをインストールします。
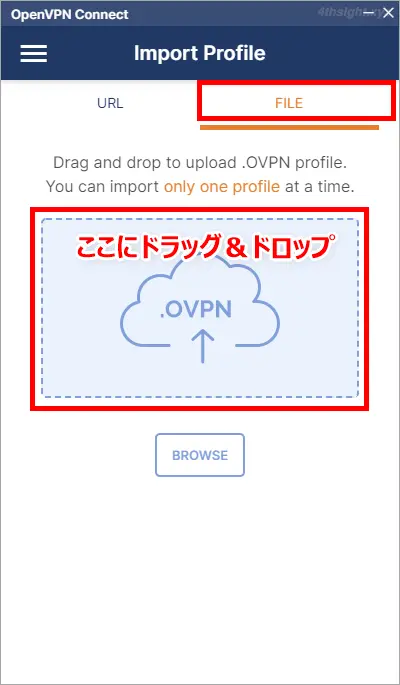
インストールが完了したら、デスクトップのアイコンなどからOpenVPN Connectを起動します。

起動して利用規約などの表示を確認し終わると、以下のようにプロファイルをインポートする画面「Import Profile」が表示されるので、「File」タブを選択してから準備しておいたovpnファイルをドラッグ&ドロップします。
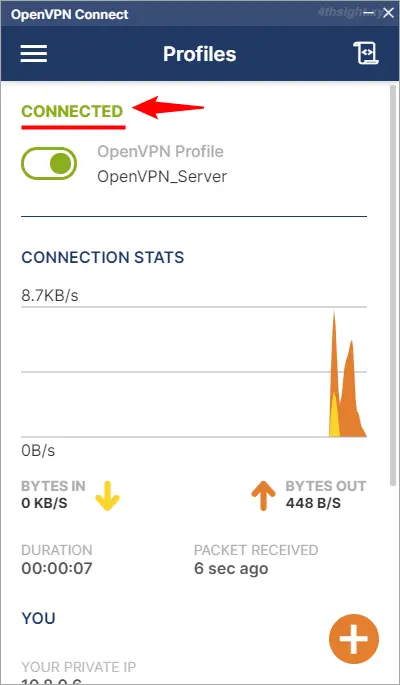
プロファイルが正しくインポートされると「Profile Name」を設定する画面が表示されるので、わかりやすい名前を設定し、接続先「Server Hostname」に誤りがないことを確認したら、画面下部の「CONNECT」をクリックします。

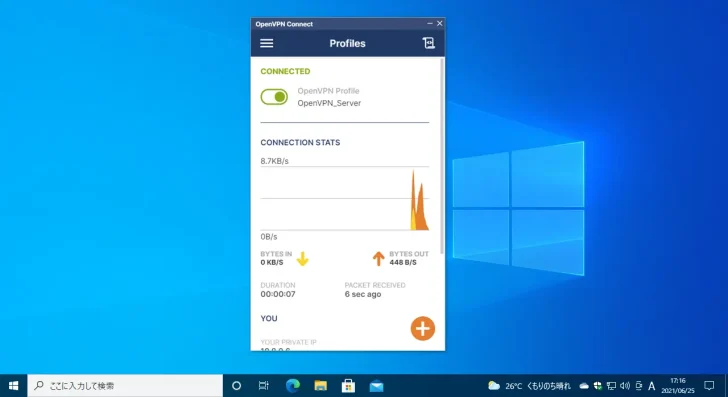
正常に接続されると、以下のように「CONNECTED」と表示され、接続情報などを確認することができます。
接続を終了するときは、同画面のスイッチをクリックします。

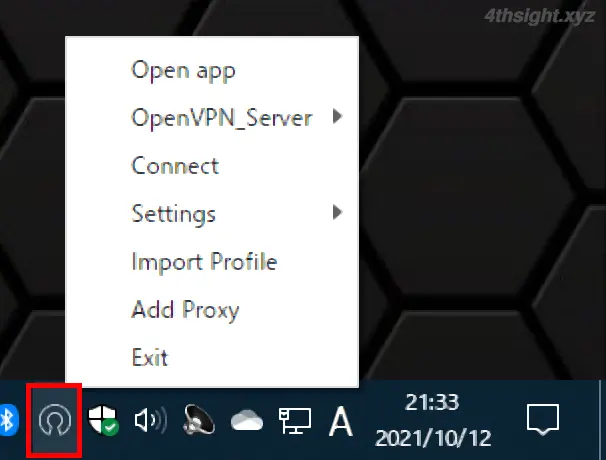
なお、接続/切断などは、タスクトレイのアイコンから行うこともできます。
あとがき
一般的な構成のOpenVPNサーバーに接続するなら「OpenVPN Connect」で十分事足ります。
なお、英語が苦手な方やうまく設定できないといったような場合は、国産のOpenVPN接続ツール「vpnux Client」を試してみるのもありでしょう。