サーバー環境などを構築する場合、構築後にサーバーが想定どおりに動作するかをテストするために、サーバーに意図的に負荷を掛けたいときがあります。
そのようなとき、テストの対象がWindowsマシンなら、Microsoftから無償提供されてい負荷ツールが便利です。
そこでここでは、WindowsマシンでCPU/メモリ/ディスクに負荷をかけるツールと、その利用方法を紹介します。
目次
CPUに負荷を掛ける
CPUに負荷を掛けるときは、Microsoftが提供している「Windows Sysinternals」に含まれるツール「CPUSTRES」を利用します。
CPUSTRESツールは、以下の公式サイトからダウンロードできます。
CpuStres - Windows Sysinternals | Microsoft Docs
ダウンロードしたZipファイルを解凍し、OS環境に応じたファイルを実行します。
- 32ビットOSなら「CPUSTRES.EXE」
- 64ビットOSなら「CPUSTRES64.EXE」
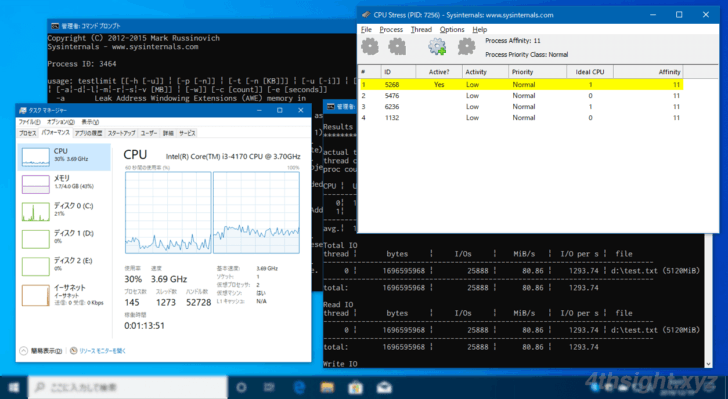
CPUSTRESを実行すると、次のような画面が表示されるので、必要な項目を選択することで、CPUに負荷を掛けることができます。
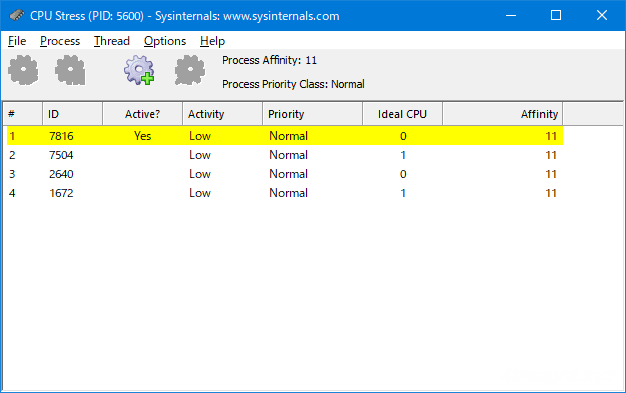
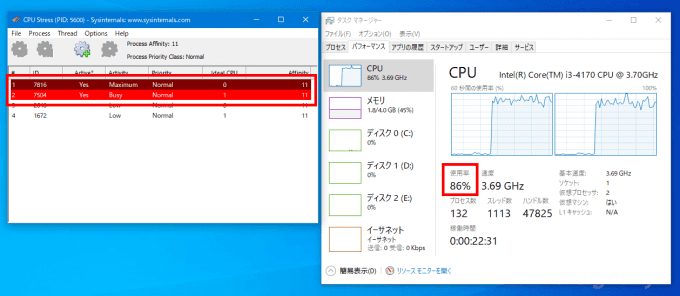
たとえば、2コアのマシンでCPU使用率を100%にしたい場合は
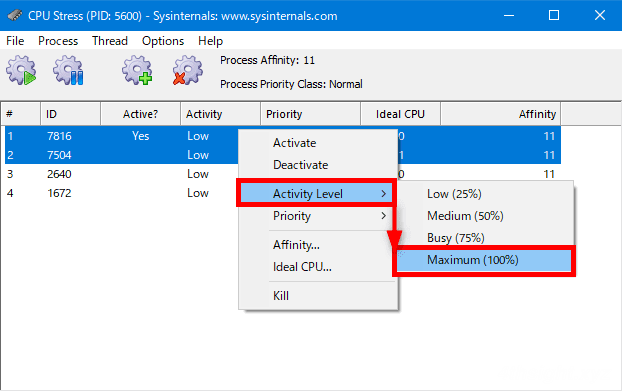
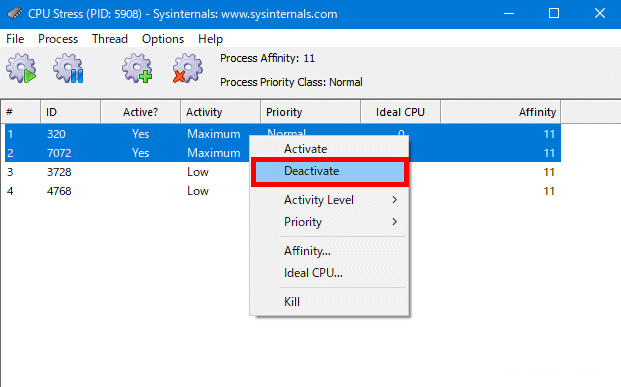
まず、Thead1・Thread2を選択した状態で、右クリックメニューから「Activity Level」を「Maximum」 に設定します。
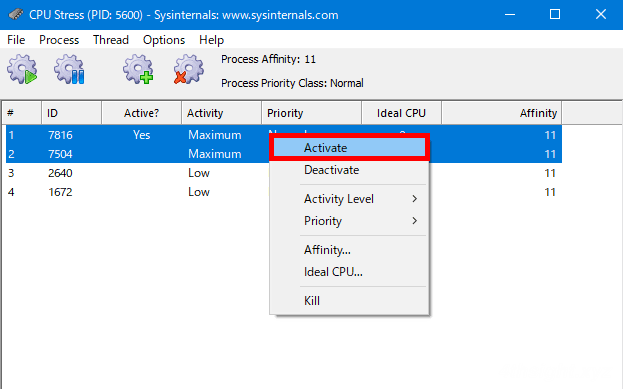
次に、同じようにThead1・Thread2を選択した状態で、右クリックメニューから「Activate」をクリックすれば、負荷がかかります。

停止する場合は、Thead1・Thread2を選択した状態で、右クリックメニューから「Deactivate」をクリックします。
CPU使用率を調整したいときは、スレッドごとのActivity Levelを調整します。
たとえば、CPU使用率を80%ほどにしたい場合は、先ほどと同じ要領でThead1もしくはThead2のいずれかのActivity Levelを「Busy」 に設定すれば、CPU全体としての使用率が80%ほどになります。
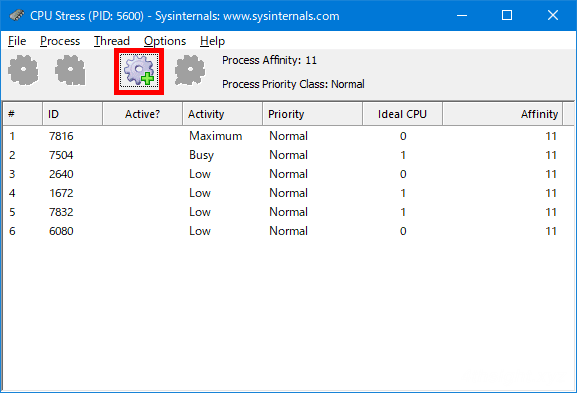
なお、スレッドを増やしたいときは、画面上部の「Create Thread」アイコンをクリックすることで、最大64スレッドまで増やせます。
メモリに負荷を掛ける
メモリに負荷を掛けるときは、Microsoftが提供している「Windows Sysinternals」に含まれるツール「Testlimit」を利用します。
Testlimitツールは、以下の公式サイトからダウンロードできます。
Testlimit - Windows Sysinternals | Microsoft Docs
「TestLimit」はコマンドラインツールのため、ダウンロードしたZipファイルを解凍したら、OS環境に応じたファイルをコマンドプロンプトから実行します。
- 32ビットOSなら「Testlimit.exe」
- 64ビットOSなら「Testlimit64.exe」
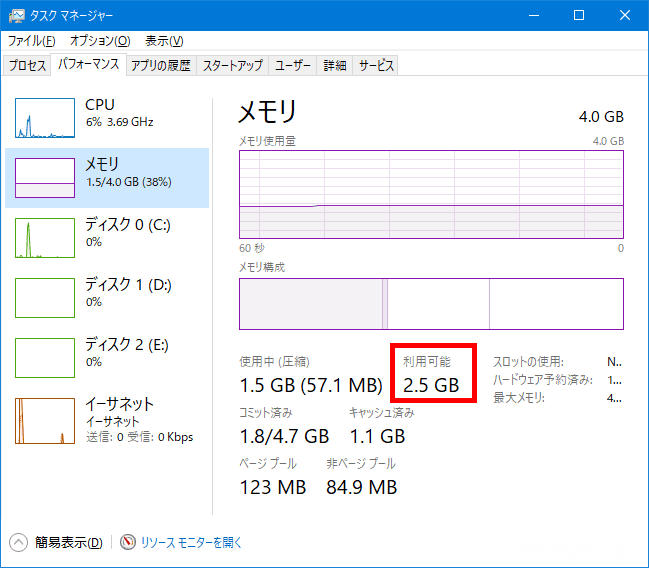
たとえば、利用可能なメモリが2.5GBある以下のような環境で、Testlimitで1.5GBのメモリを確保してみます。
コマンドプロンプトには、次にように入力します。
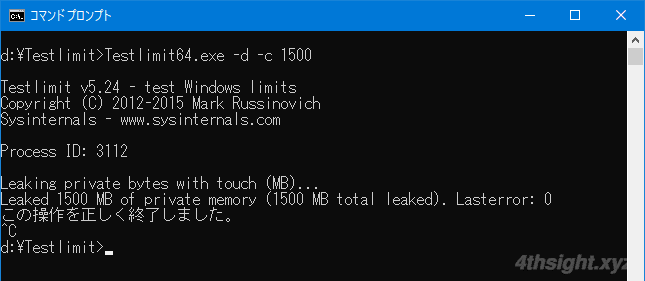
> Testlimit64.exe -d -c 1500すると、利用可能なメモリサイズが、Testlimitで確保したサイズだけ減っていることが分かります。
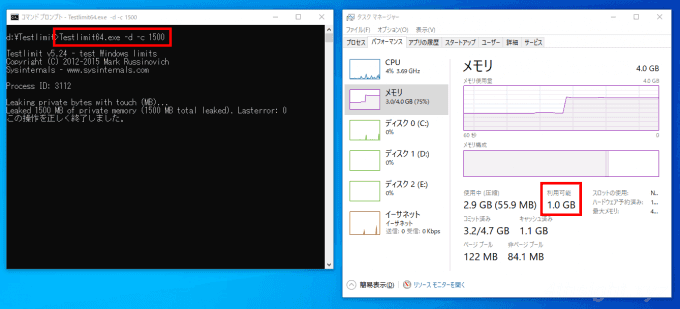
Testlimitは実行を終了させるまでメモリを確保し続けるので、終了するときは、コマンドプロンプトで「Ctrl+C」キーを入力します。
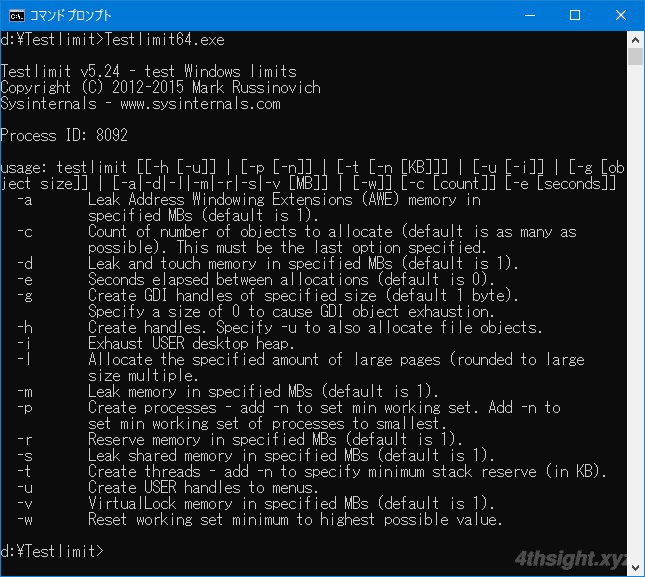
なお、引数なしで実行すれば、コマンドのヘルプを確認できます。
ディスクに負荷を掛ける
ディスクに負荷を掛ける場合は、Micorosftで提供されている「DiskSpd」を利用します。
「DiskSpd」は、ディスクのパフォーマンスを計測するツールですが、ディスクへ負荷を掛けるという使い方もできます。
ツールは以下からダウンロードできます。
「DiskSpd」はコマンドラインツールのため、ダウンロードしたZipファイルを解凍したら、OS環境に応じたファイルをコマンドプロンプトから実行します。
- 32ビットOSなら「x86」フォルダーにある「diskspd.exe」
- 64ビットOSなら「amd64」フォルダーにある「diskspd.exe」
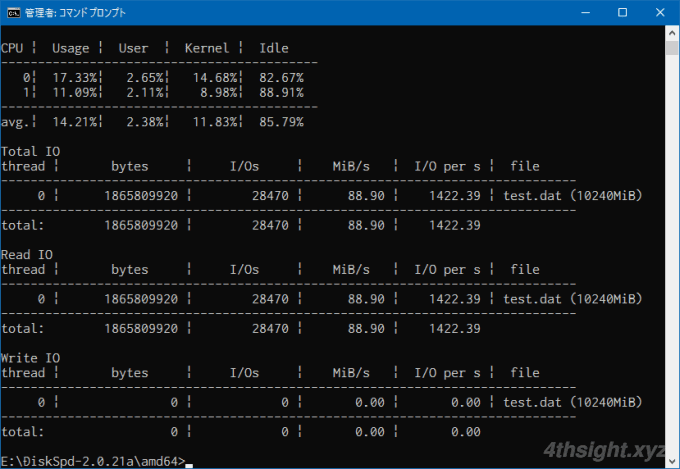
たとえば、管理者権限でコマンドプロンプトを起動し、以下のようなコマンドを実行すると、コマンド実行中はディスク使用率が100%になります。
> diskspd.exe -c10G -d20 test.dat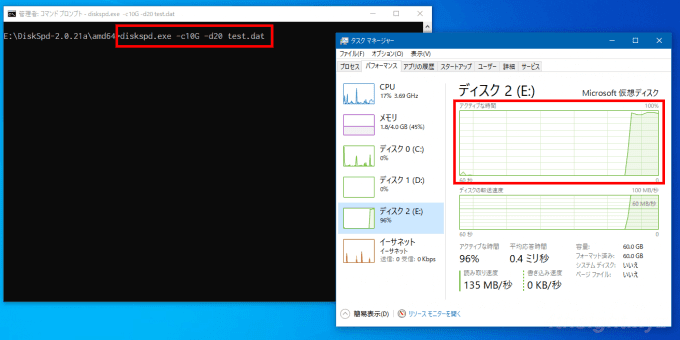
ちなみに、上のコマンドでは「カレントディレクトリに10GBのファイル「test.dat」を作成し、20秒間の読み込みを実行」しています。
実行が終了すると、以下のように結果レポートが表示されます。
Diskspdのヘルプを確認してみると、かなり細かくオプションを指定できるので、ディスク周りのパフォーマンスを詳細に計測したい場合にも有用でしょう。
> diskspd.exe -?

Usage: diskspd.exe [options] target1 [ target2 [ target3 ...] ]
version 2.0.21a (2018/9/21)

Available targets:
       file_path
       #<physical drive number>
       <partition_drive_letter>:

Available options:
  -?                    display usage information
  -ag                   group affinity - affinitize threads round-robin to cores in Processor Groups 0 - n.
                          Group 0 is filled before Group 1, and so forth.
                          [default; use -n to disable default affinity]
  -ag#,#[,#,...]>       advanced CPU affinity - affinitize threads round-robin to the CPUs provided. The g# notation
                          specifies Processor Groups for the following CPU core #s. Multiple Processor Groups
                          may be specified, and groups/cores may be repeated. If no group is specified, 0 is assumed.
                          Additional groups/processors may be added, comma separated, or on separate parameters.
                          Examples: -a0,1,2 and -ag0,0,1,2 are equivalent.
                                    -ag0,0,1,2,g1,0,1,2 specifies the first three cores in groups 0 and 1.
                                    -ag0,0,1,2 -ag1,0,1,2 is equivalent.
  -b<size>[K|M|G]       block size in bytes or KiB/MiB/GiB [default=64K]
  -B<offs>[K|M|G|b]     base target offset in bytes or KiB/MiB/GiB/blocks [default=0]
                          (offset from the beginning of the file)
  -c<size>[K|M|G|b]     create files of the given size.
                          Size can be stated in bytes or KiB/MiB/GiB/blocks
  -C<seconds>           cool down time - duration of the test after measurements finished [default=0s].
  -D<milliseconds>      Capture IOPs statistics in intervals of <milliseconds>; these are per-thread
                          per-target: text output provides IOPs standard deviation, XML provides the full
                          IOPs time series in addition. [default=1000, 1 second].
  -d<seconds>           duration (in seconds) to run test [default=10s]
  -f<size>[K|M|G|b]     target size - use only the first <size> bytes or KiB/MiB/GiB/blocks of the file/disk/partition,
                          for example to test only the first sectors of a disk
  -f<rst>               open file with one or more additional access hints
                          r : the FILE_FLAG_RANDOM_ACCESS hint
                          s : the FILE_FLAG_SEQUENTIAL_SCAN hint
                          t : the FILE_ATTRIBUTE_TEMPORARY hint
                          [default: none]
  -F<count>             total number of threads (conflicts with -t)
  -g<bytes per ms>      throughput per-thread per-target throttled to given bytes per millisecond
                          note that this can not be specified when using completion routines
                          [default inactive]
  -h                    deprecated, see -Sh
  -i<count>             number of IOs per burst; see -j [default: inactive]
  -j<milliseconds>      interval in <milliseconds> between issuing IO bursts; see -i [default: inactive]
  -I<priority>          Set IO priority to <priority>. Available values are: 1-very low, 2-low, 3-normal (default)
  -l                    Use large pages for IO buffers
  -L                    measure latency statistics
  -n                    disable default affinity (-a)
  -N<vni>               specify the flush mode for memory mapped I/O
                          v : uses the FlushViewOfFile API
                          n : uses the RtlFlushNonVolatileMemory API
                          i : uses RtlFlushNonVolatileMemory without waiting for the flush to drain
                          [default: none]
  -o<count>             number of outstanding I/O requests per target per thread
                          (1=synchronous I/O, unless more than 1 thread is specified with -F)
                          [default=2]
  -O<count>             number of outstanding I/O requests per thread - for use with -F
                          (1=synchronous I/O)
  -p                    start parallel sequential I/O operations with the same offset
                          (ignored if -r is specified, makes sense only with -o2 or greater)
  -P<count>             enable printing a progress dot after each <count> [default=65536]
                          completed I/O operations, counted separately by each thread
  -r<align>[K|M|G|b]    random I/O aligned to <align> in bytes/KiB/MiB/GiB/blocks (overrides -s)
  -R<text|xml>          output format. Default is text.
  -s[i]<size>[K|M|G|b]  sequential stride size, offset between subsequent I/O operations
                          [default access=non-interlocked sequential, default stride=block size]
                          In non-interlocked mode, threads do not coordinate, so the pattern of offsets
                          as seen by the target will not be truly sequential.  Under -si the threads
                          manipulate a shared offset with InterlockedIncrement, which may reduce throughput,
                          but promotes a more sequential pattern.
                          (ignored if -r specified, -si conflicts with -T and -p)
  -S[bhmruw]            control caching behavior [default: caching is enabled, no writethrough]
                          non-conflicting flags may be combined in any order; ex: -Sbw, -Suw, -Swu
  -S                    equivalent to -Su
  -Sb                   enable caching (default, explicitly stated)
  -Sh                   equivalent -Suw
  -Sm                   enable memory mapped I/O
  -Su                   disable software caching, equivalent to FILE_FLAG_NO_BUFFERING
  -Sr                   disable local caching, with remote sw caching enabled; only valid for remote filesystems
  -Sw                   enable writethrough (no hardware write caching), equivalent to FILE_FLAG_WRITE_THROUGH or
                          non-temporal writes for memory mapped I/O (-Sm)
  -t<count>             number of threads per target (conflicts with -F)
  -T<offs>[K|M|G|b]     starting stride between I/O operations performed on the same target by different threads
                          [default=0] (starting offset = base file offset + (thread number * <offs>)
                          makes sense only with #threads > 1
  -v                    verbose mode
  -w<percentage>        percentage of write requests (-w and -w0 are equivalent and result in a read-only workload).
                        absence of this switch indicates 100% reads
                          IMPORTANT: a write test will destroy existing data without a warning
  -W<seconds>           warm up time - duration of the test before measurements start [default=5s]
  -x                    use completion routines instead of I/O Completion Ports
  -X<filepath>          use an XML file for configuring the workload. Cannot be used with other parameters.
  -z[seed]              set random seed [with no -z, seed=0; with plain -z, seed is based on system run time]

Write buffers:
  -Z                        zero buffers used for write tests
  -Zr                       per IO random buffers used for write tests - this incurrs additional run-time
                              overhead to create random content and shouln't be compared to results run
                              without -Zr
  -Z<size>[K|M|G|b]         use a <size> buffer filled with random data as a source for write operations.
  -Z<size>[K|M|G|b],<file>  use a <size> buffer filled with data from <file> as a source for write operations.

  By default, the write buffers are filled with a repeating pattern (0, 1, 2, ..., 255, 0, 1, ...)

Synchronization:
  -ys<eventname>     signals event <eventname> before starting the actual run (no warmup)
                       (creates a notification event if <eventname> does not exist)
  -yf<eventname>     signals event <eventname> after the actual run finishes (no cooldown)
                       (creates a notification event if <eventname> does not exist)
  -yr<eventname>     waits on event <eventname> before starting the run (including warmup)
                       (creates a notification event if <eventname> does not exist)
  -yp<eventname>     stops the run when event <eventname> is set; CTRL+C is bound to this event
                       (creates a notification event if <eventname> does not exist)
  -ye<eventname>     sets event <eventname> and quits

Event Tracing:
  -e<q|c|s>             Use query perf timer (qpc), cycle count, or system timer respectively.
                          [default = q, query perf timer (qpc)]
  -ep                   use paged memory for the NT Kernel Logger [default=non-paged memory]
  -ePROCESS             process start & end
  -eTHREAD              thread start & end
  -eIMAGE_LOAD          image load
  -eDISK_IO             physical disk IO
  -eMEMORY_PAGE_FAULTS  all page faults
  -eMEMORY_HARD_FAULTS  hard faults only
  -eNETWORK             TCP/IP, UDP/IP send & receive
  -eREGISTRY            registry calls


Examples:

Create 8192KB file and run read test on it for 1 second:

  diskspd.exe -c8192K -d1 testfile.dat

Set block size to 4KB, create 2 threads per file, 32 overlapped (outstanding)
I/O operations per thread, disable all caching mechanisms and run block-aligned random
access read test lasting 10 seconds:

  diskspd.exe -b4K -t2 -r -o32 -d10 -Sh testfile.dat

Create two 1GB files, set block size to 4KB, create 2 threads per file, affinitize threads
to CPUs 0 and 1 (each file will have threads affinitized to both CPUs) and run read test
lasting 10 seconds:

  diskspd.exe -c1G -b4K -t2 -d10 -a0,1 testfile1.dat testfile2.dat

E:>
あとがき
Windowsマシンで負荷テストを実施するときや、リソース監視できているかをチェックするときに、ここで紹介したツールが役立つと思います。
ご活用あれ。